LIFESCOPE-ETL
Repository
(production phase, high priority)
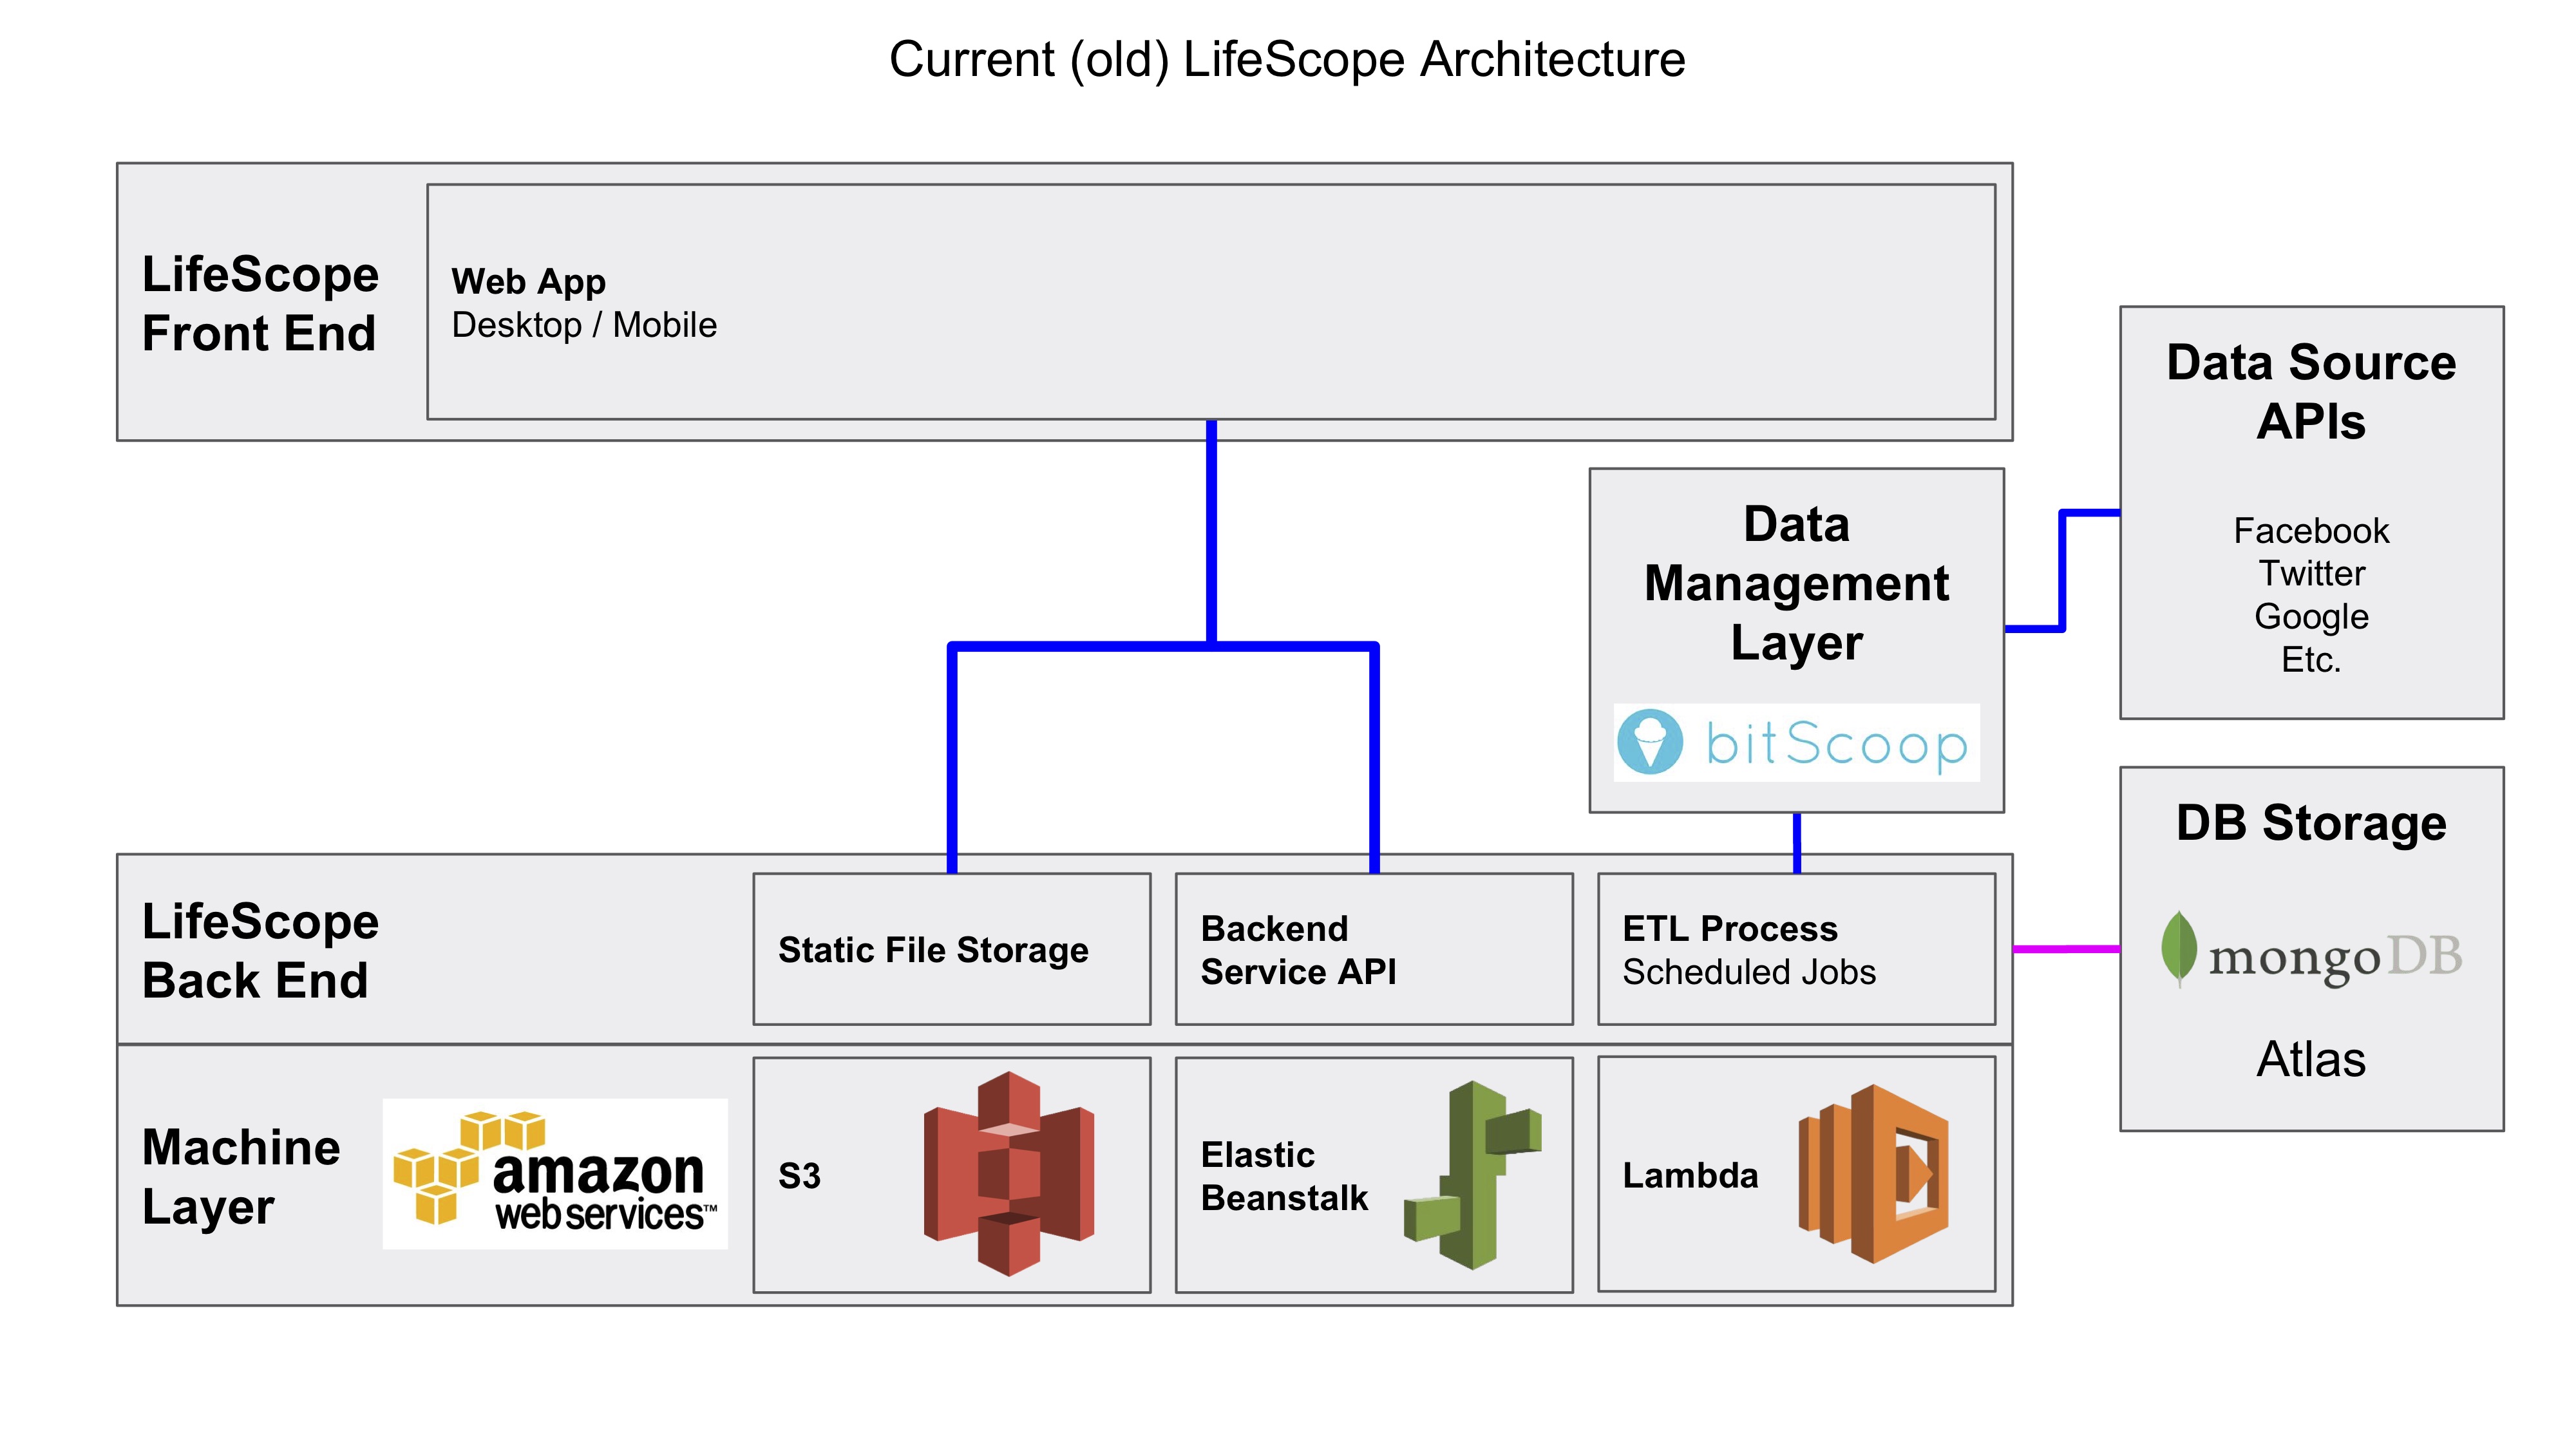
This is the LIFESCOPE automated data collection system for connected services. The serverless ETL functions are built for Lambda and pull user data data from APIs on a scheduled basis into MongoDB.
- Pull data from source apis through BitScoop SDK
- Syncs on a scheduled basis.
- Transform data into LIFESCOPE schema.
- Provider scripts keep a copy of original data.
Requirements
- MVP: Change current ETL Provider Scripts to save via GraphQL instead of MongoDB directly.
- Add support for new Providers and expand support of current providers.
- Make ETL system platform independent and able to run locally on a scheduled basis.
Dependencies
- AWS Lambda (Plans to move to Serverless)
- BitScoop Platform
Examples
| Data Source | Status | Data Collected |
|---|---|---|
| production | events, content, contacts, locations | |
| production | events, content, contacts, locations | |
| beta | events, content, locations | |
| Dropbox | production | events, content, locations |
| Steam | production | events, content |
| production | events, content, contacts, contacts | |
| Spotify | production | events, content |
| GitHub | production | events, content, contacts |
| production | events, content, contacts | |
| production | events, content, contacts | |
| Slice | development | events, content, things |
| FitBit | planned | events, things |
| TV Time | planned | events, content |
LIFESCOPE Archive App
Note: DEPRICATED
The old front end LIFESCOPE app is in the LIFESCOPE-etl /archive folder.
Old Frontend App Architecture
Learn more about the Old Frontend App:
https://github.com/LifeScopeLabs/lifescope-etl/tree/master/archive/tutorial
AWS services Required
You will also need to upload various portions of this project to Lambda, ElasticBeanstalk, and S3, and you will create two SQS queues to facilitate communication between some of the Lambda functions.
We’ll start with creating an S3 bucket since it’s a prerequisite for other parts.
We have to wait to upload the static files until later since they require the domain of the webserver, which doesn’t exist yet.
Create S3 bucket static files to S3
Go to S3 and create a new bucket.
Give it a name and select the region that’s closest to you, then click Next.
You can leave Versioning, Logging, and Tags disabled, so click Next.
Open the ‘Manage Group Permissions’ accordion and give Everyone Read access to Objects (NOT Object Permissions).
Click Next, review everything, then click Create Bucket.
Lastly, go to the following files and replace INSERT S3 BUCKET NAME HERE with the name of the S3 bucket you created earlier:
- config/default.json
- templates/home.html
- templates/login.html
- templates/components/header.html
Also copy the IDs of the Login Maps into their respective places in ‘login..id’.
Build Lambda functions and webserver code
From the top level of the project run
gulp bundle:lambda
to zip up all of the Lambda functions, then run
gulp bundle:ebs
to zip up the webserver code for deployment to ElasticBeanstalk.
Create SQS queues
Next we’re going to create the SQS queues, as they need to be set up before some of the Lambda functions are created.
Go to SQS and click on Create New Queue.
Name it ‘LIFESCOPE-jobs-dead-letter’ and make sure it’s a Standard Queue.
Click Quick Create Queue at the bottom of the page.
You should be taken back to the home page for SQS.
Create another queue, name this one ‘LIFESCOPE-jobs’, and make sure it’s also a Standard Queue.
Click on the Configure Queue button at the bottom instead of Quick Create.
Check ‘Use Redrive Policy’, set the Dead Letter Queue to ‘LIFESCOPE-jobs-dead-letter’ and Maximum Receives to 5, then click Create Queue.
Finally, click on one of the queues and, under the Details tab, take note of its URL.
Get the URL for the other queue as well.
What this does is create a regular queue for scheduled jobs.
If a job fails 5 times, it gets sent to the dead letter queue.
If we wanted to do some analysis on failed jobs to figure out why they failed, we’d have a record of them in the dead letter queue.
Create IAM role
Go to IAM roles.
Create a new role and click the Select button next to AWS Lambda.
You’ll want to search for and add four policies:
- AmazonSQSFullAccess
- AWSLambdaVPCAccessExecutionRole
- AWSLambdaBasicExecution
- AWSCloudFormationReadOnlyAccess
Click next step, name it something like ‘lifescope’, then create the role.
We’re also going to need to create a custom policy and add it as well.
Go to Policies and create a new one.
Click Select next to Policy Generator.
From the dropdown for Service, select AWS Lambda.
Leave the Effect as ‘Allow’.
After that, from the dropdown for Actions select InvokeFunction.
For Amazon Resource Name enter ‘*’, then click Add Statement.
Finally, click Next Step, then give this policy a name like ‘LambdaInvoke’, then click Create Policy.
Go back to the ‘lifescope’ role and under the Permissions tab select Attach Policy.
Search for the LambdaInvoke policy you just made, check it, then click Attach Policy.
Create Lambda functions
Next we’re going to creating four lambda functions for some recurring tasks that will be run, as well as a migration script.
Follow this general flow for each of them, paying attention to instructions specific to a given function.
You must create the ‘worker’ function before the ‘lifescope-consumer’ function, as the latter needs the ARN of the former as an Environment Variable.
Go to https://console.aws.amazon.com/lambda/home and click ‘Create a Lambda function’. Make sure you are in the eu-west-1, us-east-1, or us-west-2 regions.
For the blueprint select ‘Blank Function’.
For lifescope-generator and lifescope-consumer, you will want to create a Trigger of type ‘CloudWatch Events’.
The Rule type should be ‘Schedule expression’.
We suggest that the expression for these triggers be ‘rate(1 minute)’, though you can go higher if you want.
When you create a rule for the first function, it will be saved under the name you gave it; for the second function, you can just select that rule instead of creating a new one.
Make sure to check ‘Enable trigger’ for each function that has a trigger, then click Next.
If this is the migrations or worker function, don’t add a trigger, just click Next.
Name the function whatever you want and set the runtime to Node.js 6.10.
For Code Entry Type click the dropdown and select ‘Upload a .ZIP file’, then click on the Upload button that appears.
Navigate to the dist/ directory in this project and select the .zip file that corresponds to the function you’re uploading.
The Handler should be ‘index.handler’.
You will need to add Environment Variables specific to each function:
lifescope-migrations
- MONGO_ADDRESS (obtained from Mongo Atlas instance)
lifescope-generator
- MONGO_ADDRESS (obtained from Mongo Atlas instance)
- QUEUE_URL (obtained from SQS queue)
lifescope-worker
- MONGO_ADDRESS (obtained from Mongo Atlas instance)
- QUEUE_URL (obtained from SQS queue)
- BITSCOOP_API_KEY (obtainable at https://bitscoop.com/keys)
- DEAD_LETTER_QUEUE_URL (obtained from SQS dead letter queue)
lifescope-consumer
- MONGO_ADDRESS (obtained from Mongo Atlas instance)
- QUEUE_URL (obtained from SQS queue)
- WORKER_FUNCTION_ARN (ARN of the worker function, found in the top right corner of its details page)
For the Role, use the ‘lifescope’ role that we created earlier.
Open the Advanced Settings accordion.
You’ll want to set the Timeout to 15 seconds.
Make sure that VPC is set to ‘No VPC’.
Hit next and you’ll be taken to a review screen, and then select ‘Create Function’ at the very bottom of the page.
You will also need to run the migrations function to set up the Mongo instance properly.
You can do this by clicking the Test button when looking at that function’s page, then clicking Save and Test.
The sample event doesn’t matter since the script doesn’t use any information from the event it’s passed.
This only needs to be run once, so you shouldn’t set up any triggers.
Upload webserver code to ElasticBeanstalk
Next we’re going to create the webserver using ElasticBeanstalk.
This will run the main application that displays your data and allows you to search through it.
Start creating a new application with ElasticBeanstalk.
Give it a name and leave Tier as ‘Web Server’.
For the Platform pick the ‘Node.js’ Preconfigured Platform.
For Application Code, select ‘Upload your code’, click the Upload button, click ‘Choose File’ under Local File, and select the ‘lifescope-ebs’ .zip file in the ‘dist’ directory and click Upload.
Note that EBS requires you to give each new version of code you upload a version label.
You can leave it as the default for this first time, but if you need to re-upload anything, you’ll have to pick a different label.
If you want to use a custom domain or make any other modifications to the instance you’re creating, click ‘Configure more options’, otherwise click ‘Create application’.
It will take a few minutes for EBS to spin up the box.
When that’s finished, go to the environment that was made for this application and get its URL, as we need to use this in some static files.
Upload static files to S3
You need to replace INSERT EBS URL HERE with the URL of your EBS environment in six static files:
- static/js/components/search.js
- static/js/explorer/explorer.js
- static/js/explorer/objects.js
- static/js/pages/providers.js
- static/js/pages/user-home.js
- static/js/site.js
Navigate to the top level of the project and run
gulp build
to compile and package all of the static files to the dist/ folder.
This will remove all of the EBS and Lambda .zip files, so if you need to upload any of them again you’ll need to re-run the appropriate gulp bundle command.
Go back to the S3 bucket in AWS, then go to the Objects tab and click Upload to have a modal appear.
Click Add Files in this modal and navigate to the ‘dist’ directory in bitscoop-social-app-demo directory, then into the directory below that (it’s a unix timestamp of when the build process was completed).
Move the file system window so that you can see the Upload modal.
Click and drag all four folders over the Upload modal (S3 requires that you drag-and-drop folders, and this only works in Chrome and Firefox).
Close the file system window, then click Next.
Open the ‘Manage Group Permissions’ accordion and give Everyone read access to Objects.
Click Next, then Next again, then review everything and click Upload.
At this point, everything should be ready to go.
Go to the EBS environment’s URL and you should be taken to the home page of the application.
How to run Lambda Local
1. Install Docker
This tutorial assumes a unix based system, and is written on an OSX system
Install docker
go to https://docs.docker.com/engine/installation/ and install docker on your system.
2. Install AWS SAM local
Note: this will install SAM local globally on your system
npm install -g aws-sam-local
Check the install using
sam --version
The template file and the environment variables file are locate in the lambda/local folder of the project.
3. Install ElasticMQ as mock SQS
You can download file distribution here: https://s3-eu-west-1.amazonaws.com/softwaremill-public/elasticmq-server-0.13.8.jar
place the JAR file in the SQS folder of the project
4.Run the SQS server
in a new shell run the following at the top level of the project
java -Dconfig.file=SQS/sqs_config/lifescopeSQS.conf -jar SQS/elasticmq-server-0.13.8.jar
4. Running SAM local
In order to begin running the local Lambda function run the following code in the top level directory of the project
sam local start-api -t lambda/local/template.yml --env-vars lambda/local/environmentVars.json
you will then be shown the urls to your lambda functions along with their port numbers.